Call +(254) 703 030 000 / 751 483 999 / 721 704 777
Frequently Asked Questions
What is the purpose of a floor drain assembly?
The purpose of a floor drain assembly is to efficiently remove excess water and prevent flooding in areas prone to water accumulation, such as bathrooms, kitchens, basements, laundry rooms, and commercial spaces. It serves several key functions:
1. **Water Drainage**: The primary function is to collect and channel water away from floors, preventing water damage and maintaining a dry environment. This is crucial in areas where water usage is frequent or where spills are likely.
2. **Flood Prevention**: By providing a direct path for water to exit, floor drains help prevent flooding, which can lead to structural damage, mold growth, and other costly issues.
3. **Hygiene and Safety**: Floor drains help maintain cleanliness by removing water that could otherwise become a breeding ground for bacteria and mold. They also reduce slip hazards by keeping floors dry.
4. **Odor Control**: Many floor drain assemblies include a trap, which holds a small amount of water to block sewer gases from entering the building, thus controlling odors.
5. **Versatility**: Floor drains can be used in various settings, from residential to industrial, and can handle different types of waste water, including gray water and, in some cases, black water.
6. **Durability and Maintenance**: Designed to withstand heavy use, floor drain assemblies are typically made from durable materials like stainless steel or cast iron. They require regular maintenance to ensure they remain clear of debris and function properly.
In summary, a floor drain assembly is an essential component in water management systems, providing effective drainage, flood prevention, and contributing to the overall safety and hygiene of a building.
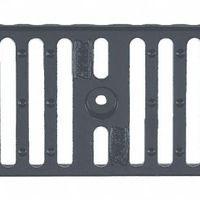
How do floor drain grates prevent clogs?
Floor drain grates prevent clogs by acting as a physical barrier that stops large debris and solid materials from entering the drainage system. The grates are designed with a series of openings or slots that allow water to pass through while trapping larger particles such as hair, leaves, dirt, and other debris. This prevents these materials from accumulating within the pipes, which could lead to blockages.
Additionally, the grates help in maintaining a consistent flow of water by ensuring that only liquid and small particles that can be easily flushed through the drainage system are allowed to pass. This reduces the risk of buildup within the pipes, which is a common cause of clogs.
Some floor drain grates are equipped with additional features like removable strainers or baskets that can be easily cleaned. These components catch smaller debris that might slip through the grate openings, providing an extra layer of protection against clogs. Regular maintenance, such as cleaning these strainers and the grate itself, is essential to ensure optimal performance and prevent clogging.
Moreover, the design and material of the grates can also contribute to their effectiveness in preventing clogs. Grates made from durable materials like stainless steel or cast iron are resistant to corrosion and wear, ensuring long-term functionality. The design, including the size and shape of the openings, is optimized to balance water flow and debris capture.
In summary, floor drain grates prevent clogs by filtering out large debris, maintaining water flow, and incorporating features that facilitate easy cleaning and maintenance.
What are the components of a floor drain system?
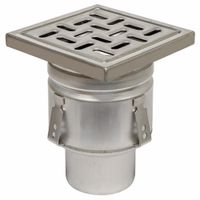
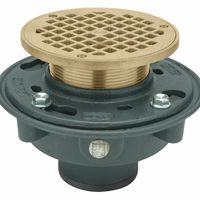
A floor drain system is an essential component in various settings, including residential, commercial, and industrial environments, designed to efficiently remove water and prevent flooding. The primary components of a floor drain system include:
1. **Drain Body**: The main structure embedded in the floor, typically made of durable materials like cast iron, stainless steel, or PVC. It houses the other components and connects to the drainage pipes.
2. **Grate or Cover**: A removable top piece that sits flush with the floor surface, allowing water to enter while preventing large debris from clogging the system. Grates are often made of metal or heavy-duty plastic.
3. **Strainer Basket**: Located beneath the grate, this component catches smaller debris that passes through the grate, preventing it from entering the drainage pipes.
4. **Trap**: A U-shaped section of pipe that holds water to create a seal, preventing sewer gases from entering the building. It is a critical component for maintaining hygiene and safety.
5. **Outlet Pipe**: The pipe that carries water away from the drain to the main sewer line or a designated drainage area. It is connected to the drain body and must be properly sloped to ensure efficient water flow.
6. **Cleanout**: An access point for maintenance and cleaning, allowing for the removal of blockages within the drain system without dismantling the entire setup.
7. **Backflow Preventer**: An optional component that prevents reverse flow of water, protecting the area from flooding due to sewer backups.
8. **Sealing Ring or Gasket**: Ensures a watertight connection between the drain body and the surrounding floor, preventing leaks.
These components work together to ensure effective drainage, prevent water accumulation, and maintain sanitary conditions.
How do you maintain a floor drain to prevent flooding?
To maintain a floor drain and prevent flooding, follow these steps:
1. **Regular Cleaning**: Remove debris, hair, and dirt from the drain cover weekly. Use a brush or vacuum to clear the area.
2. **Flush with Water**: Pour hot water down the drain monthly to clear minor blockages and remove soap scum buildup.
3. **Use a Drain Cleaner**: Apply a non-corrosive, enzyme-based drain cleaner every few months to break down organic material and prevent clogs.
4. **Check for Blockages**: Inspect the drain for slow drainage or standing water. Use a plunger or plumber’s snake to clear any obstructions.
5. **Maintain the Trap Seal**: Ensure the trap seal is filled with water to prevent sewer gases from entering. Pour a gallon of water into the drain monthly.
6. **Install a Backflow Preventer**: Consider installing a backflow preventer to stop sewage from backing up into the drain during heavy rain.
7. **Inspect for Damage**: Regularly check for cracks or damage in the drain and surrounding floor. Repair any issues promptly to prevent leaks.
8. **Test Drainage**: Pour water into the drain to ensure it flows freely. If water drains slowly, investigate and address the cause.
9. **Professional Inspection**: Schedule annual inspections with a plumber to assess the condition of the drain and pipes.
10. **Educate Household Members**: Inform everyone in the household about what should not be disposed of in the drain, such as grease or large food particles.
By following these maintenance steps, you can effectively prevent flooding and ensure your floor drain functions properly.
What is the difference between a floor drain and a floor sink?
A floor drain and a floor sink are both plumbing fixtures used to manage wastewater, but they serve different purposes and have distinct characteristics.
A floor drain is a plumbing fixture installed at floor level, designed to remove standing water from surfaces. It typically features a grate or cover and is connected to a drainage system. Floor drains are commonly found in areas prone to water accumulation, such as bathrooms, basements, garages, and laundry rooms. They are designed to handle low to moderate volumes of water and are often used to prevent flooding by channeling water away quickly. Floor drains are generally smaller in size and have a simple design, focusing on efficient water removal.
In contrast, a floor sink is a larger, recessed plumbing fixture that resembles a small basin or sink installed at floor level. It is designed to handle higher volumes of wastewater and is commonly used in commercial kitchens, food service areas, and industrial settings. Floor sinks are equipped with a strainer or basket to catch debris, preventing clogs in the drainage system. They are often used to receive wastewater from indirect waste lines, such as those from dishwashers, ice machines, or beverage dispensers. The design of a floor sink allows for easy cleaning and maintenance, making it suitable for environments where hygiene is crucial.
In summary, the primary difference between a floor drain and a floor sink lies in their size, capacity, and intended use. Floor drains are smaller and used for general water removal, while floor sinks are larger, designed to handle higher volumes of wastewater, and are often used in commercial or industrial settings.
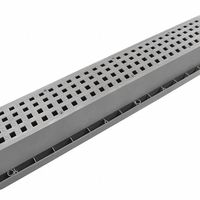
How do trench drains work?
Trench drains, also known as channel drains, are linear drainage systems designed to collect and redirect surface water away from specific areas, preventing flooding and erosion. They consist of a long, narrow channel with a grated top, which is installed flush with the ground surface. The grated cover allows water to enter the channel while preventing debris from clogging the system.
The trench drain system works through a combination of gravity and sloping. The channel is typically installed with a slight slope, allowing water to flow naturally towards a designated outlet or drainage point. This slope ensures efficient water movement, minimizing the risk of standing water and promoting effective drainage.
The trench itself is usually made from materials like concrete, polymer, or metal, chosen for their durability and resistance to environmental factors. The grates can be made from various materials, including cast iron, stainless steel, or plastic, depending on the load requirements and aesthetic preferences.
Installation involves excavating a trench to the desired depth and width, ensuring the slope is correct for optimal water flow. The channel is then placed in the trench, and the surrounding area is backfilled and compacted to secure the system in place. The grate is installed on top, completing the system.
Trench drains are commonly used in areas like driveways, parking lots, pool decks, and industrial sites, where efficient water management is crucial. They help prevent water accumulation that can lead to structural damage, slippery surfaces, and other hazards. By effectively channeling water away, trench drains contribute to maintaining the integrity and safety of both residential and commercial properties.
What are the best practices for installing a floor drain system?
1. **Planning and Design**: Assess the area to determine the best location for the floor drain, ensuring it is the lowest point for effective drainage. Consider the slope of the floor, typically 1/4 inch per foot towards the drain.
2. **Material Selection**: Choose durable materials like stainless steel or PVC for the drain and piping, considering the environment and type of liquid being drained.
3. **Compliance and Permits**: Ensure compliance with local building codes and obtain necessary permits. Consult with a professional if needed.
4. **Excavation and Preparation**: Excavate the area where the drain will be installed. Ensure the subfloor is stable and compacted to prevent settling.
5. **Installation of Drain Body**: Position the drain body at the planned location. Secure it firmly to prevent movement during concrete pouring.
6. **Piping and Connections**: Connect the drain to the main drainage system using appropriate fittings. Ensure all connections are watertight to prevent leaks.
7. **Slope Creation**: Create a consistent slope in the floor towards the drain. Use a screed to ensure the slope is even and meets the required gradient.
8. **Concrete Pouring**: Pour concrete around the drain, ensuring it is level with the drain’s edge. Use a trowel to smooth the surface and maintain the slope.
9. **Grate Installation**: Once the concrete has cured, install the drain grate. Ensure it is flush with the floor surface to prevent tripping hazards.
10. **Testing**: Test the drainage system by pouring water to ensure it flows correctly towards the drain without pooling.
11. **Maintenance Plan**: Establish a regular maintenance schedule to clean the drain and prevent clogs, ensuring long-term functionality.