Call +(254) 703 030 000 / 751 483 999 / 721 704 777
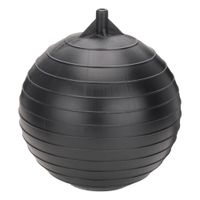
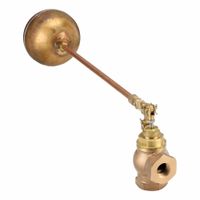
Float Valves & Floats
Float valves regulate liquid levels in vessels such as tanks and troughs. They consist of the valve body, a lever or rod, and the valve's float. The float is attached to the valve's rod and rests on the surface of a liquid and the rod rises and falls as liquid levels increase or decrease. The valve .....Read More
Frequently Asked Questions
What is a float valve and how does it work?
A float valve is a mechanical device used to regulate the flow of liquid into a tank or container. It operates based on the principle of buoyancy, using a float attached to a lever arm to control the opening and closing of a valve.
The float, typically made of a buoyant material like plastic or metal, rises and falls with the liquid level. As the liquid level rises, the float rises, causing the lever arm to pivot. This pivoting action moves the valve mechanism, gradually closing the valve to restrict the flow of liquid into the tank. Conversely, as the liquid level drops, the float descends, causing the lever arm to pivot in the opposite direction, opening the valve to allow more liquid to enter.
Float valves are commonly used in applications such as toilet tanks, water storage tanks, and cooling systems. They ensure that the liquid level is maintained within a desired range, preventing overflow or dry running. The design of the float valve allows for automatic operation without the need for external power or manual intervention.
The effectiveness of a float valve depends on factors such as the size and material of the float, the length and angle of the lever arm, and the design of the valve seat. Proper installation and maintenance are crucial to ensure reliable operation, as debris or wear can affect the valve's performance. Overall, float valves are a simple yet efficient solution for liquid level control in various systems.
How do you adjust a float valve?
To adjust a float valve, follow these steps:
1. **Turn Off Water Supply**: Locate the shut-off valve near the toilet or tank and turn it off to stop water flow.
2. **Remove Tank Lid**: Carefully lift the lid off the tank and set it aside.
3. **Identify Float Type**: Determine if you have a ball float or a cup float. A ball float is attached to a long arm, while a cup float slides along the fill valve.
4. **Adjust Ball Float**:
- Locate the adjustment screw on top of the fill valve where the float arm is attached.
- Use a screwdriver to turn the screw clockwise to lower the water level or counterclockwise to raise it.
- Alternatively, gently bend the float arm down to lower the water level or up to raise it.
5. **Adjust Cup Float**:
- Find the adjustment rod or screw on the side of the fill valve.
- Pinch the clip on the float cup and slide it up to raise the water level or down to lower it.
- Some models have a screw on top of the fill valve; turn it clockwise to lower the water level or counterclockwise to raise it.
6. **Check Water Level**: Ensure the water level is about 1 inch below the top of the overflow tube.
7. **Test Flush**: Turn the water supply back on and let the tank fill. Flush the toilet to ensure the water level is correct and the valve shuts off properly.
8. **Replace Tank Lid**: Once satisfied with the adjustment, replace the tank lid.
9. **Monitor**: Observe a few flushes to ensure consistent performance.
Adjustments may vary slightly depending on the specific float valve model.
What are the common problems with float valves?
Common problems with float valves include:
1. **Sticking or Jamming**: Float valves can become stuck due to mineral deposits, debris, or corrosion, preventing them from opening or closing properly.
2. **Wear and Tear**: Over time, the components of a float valve, such as the float ball or arm, can wear out, leading to malfunction.
3. **Improper Adjustment**: If the float arm is not adjusted correctly, it can cause the valve to close too early or too late, leading to overflow or insufficient water levels.
4. **Float Ball Issues**: The float ball can become waterlogged or damaged, causing it to sink and fail to regulate the water level effectively.
5. **Seal or Washer Deterioration**: The seals or washers within the valve can degrade, leading to leaks or failure to shut off the water supply completely.
6. **Corrosion**: Metal components of the valve can corrode, especially in hard water conditions, affecting the valve's functionality.
7. **Blockages**: Debris or sediment can block the valve, preventing it from operating smoothly.
8. **Pressure Fluctuations**: Variations in water pressure can affect the valve's performance, causing it to open or close unexpectedly.
9. **Temperature Effects**: Extreme temperatures can cause materials to expand or contract, affecting the valve's operation.
10. **Installation Errors**: Incorrect installation can lead to misalignment or improper functioning of the valve.
11. **Material Fatigue**: Repeated use can cause fatigue in the materials, leading to cracks or breaks.
12. **Incompatibility**: Using a float valve that is not suitable for the specific system or application can lead to operational issues.
Regular maintenance and inspection can help mitigate these problems, ensuring the float valve functions correctly.
How do you install a float valve in a tank?
1. **Select the Location**: Choose a spot on the tank where the float valve will be installed, typically near the top to control the water level effectively.
2. **Turn Off Water Supply**: Ensure the water supply to the tank is turned off to prevent any overflow or spillage during installation.
3. **Mark the Hole**: Use a marker to indicate where the hole for the float valve will be drilled. Ensure it is at a height that allows the valve to control the desired water level.
4. **Drill the Hole**: Use a drill with an appropriate-sized bit to create a hole in the tank wall. The hole size should match the diameter of the float valve's threaded shank.
5. **Insert the Valve**: Place the float valve through the hole from the inside of the tank. Ensure the float arm is positioned correctly to move freely up and down.
6. **Secure the Valve**: From the outside of the tank, attach the washer and nut onto the threaded shank of the valve. Tighten the nut to secure the valve in place, ensuring a watertight seal.
7. **Connect the Water Supply**: Attach the water supply line to the inlet of the float valve. Use Teflon tape on the threads to prevent leaks.
8. **Adjust the Float**: Set the float to the desired water level by adjusting the float arm. This can usually be done by bending the arm or adjusting a screw, depending on the valve design.
9. **Test the Installation**: Turn the water supply back on and observe the float valve operation. Ensure it stops the water flow at the set level and there are no leaks.
10. **Make Final Adjustments**: If necessary, make further adjustments to the float arm to achieve the precise water level control.
What materials are float valves made from?
Float valves are typically made from a variety of materials, each chosen for its specific properties to suit different applications and environments. Common materials include:
1. **Brass**: Known for its durability and resistance to corrosion, brass is often used in float valves for water systems. It is suitable for both residential and industrial applications.
2. **Stainless Steel**: This material is highly resistant to corrosion and can withstand high temperatures and pressures, making it ideal for industrial applications, especially in harsh environments.
3. **Plastic**: Materials like PVC, polypropylene, and polyethylene are used for their lightweight nature and resistance to corrosion. Plastic float valves are often used in applications where chemical resistance is important, such as in chemical processing or agricultural settings.
4. **Bronze**: Similar to brass, bronze offers good corrosion resistance and is often used in marine environments or where water quality is a concern.
5. **Cast Iron**: Used in heavy-duty applications, cast iron float valves are robust and can handle high pressures, but they are prone to rust if not properly coated or maintained.
6. **Nylon**: This material is used for its strength and resistance to wear and chemicals. Nylon float valves are often found in applications where durability and chemical resistance are required.
7. **EPDM and Nitrile Rubber**: These materials are used for seals and gaskets within float valves due to their flexibility and resistance to various chemicals and temperatures.
The choice of material depends on factors such as the type of fluid being controlled, the operating environment, temperature, pressure, and cost considerations. Each material offers distinct advantages and limitations, making it crucial to select the appropriate one for the specific application.
How do you maintain a float valve?
1. **Inspection**: Regularly check the float valve for any visible signs of wear, corrosion, or damage. Ensure the float moves freely without obstruction.
2. **Cleaning**: Remove any debris or mineral deposits from the valve and float. Use a soft brush and a mild cleaning solution to prevent damage.
3. **Adjustment**: Ensure the float is set at the correct level to maintain the desired water level. Adjust the float arm or screw as needed to achieve the proper water level.
4. **Seal Check**: Inspect the valve seal for wear or damage. Replace the seal if it is cracked or worn to prevent leaks.
5. **Lubrication**: Apply a suitable lubricant to the moving parts of the valve to ensure smooth operation. Avoid over-lubricating, which can attract dirt.
6. **Leak Test**: After maintenance, test the valve for leaks by filling the tank and observing the operation. Ensure the valve shuts off completely when the desired water level is reached.
7. **Replacement**: If the valve or float is damaged beyond repair, replace it with a compatible model. Ensure all connections are secure and watertight.
8. **Regular Maintenance Schedule**: Establish a routine maintenance schedule based on the manufacturer's recommendations and the specific conditions of your system.
9. **Documentation**: Keep a record of maintenance activities, including dates and any parts replaced, to track the valve's condition over time.
10. **Professional Assistance**: If unsure about any maintenance step, consult a professional to avoid damaging the system or compromising safety.
What are the different types of float valves?
1. **Ballcock Valve**: Commonly used in toilet tanks, this valve uses a floating ball attached to a lever to control water flow. As the water level rises, the ball floats up, pushing the lever to close the valve.
2. **Diaphragm Float Valve**: Utilizes a diaphragm to control water flow. The float is connected to a lever that moves the diaphragm, opening or closing the valve based on the water level.
3. **Piston Float Valve**: Similar to the diaphragm type but uses a piston instead. The float's movement controls the piston's position, regulating the water flow.
4. **Needle Float Valve**: Features a needle-like plunger that fits into a seat to control flow. The float's movement adjusts the needle's position, allowing precise control of fluid levels.
5. **Pilot-Operated Float Valve**: Uses a small pilot valve to control a larger main valve. The float operates the pilot valve, which in turn controls the main valve, suitable for high-pressure systems.
6. **Lever-Operated Float Valve**: A simple design where the float is directly attached to a lever that opens or closes the valve. Common in low-pressure applications.
7. **Weighted Float Valve**: Incorporates a weighted float to provide additional force for closing the valve, useful in systems with high flow rates or pressures.
8. **Angle Float Valve**: Designed for applications where the inlet and outlet are at a 90-degree angle, often used in confined spaces.
9. **Vertical Float Valve**: The float moves vertically to control the valve, suitable for applications with limited horizontal space.
10. **Horizontal Float Valve**: The float moves horizontally, ideal for tanks with limited vertical space.
11. **Miniature Float Valve**: Small-sized valves used in compact systems or appliances where space is limited.