Call +(254) 703 030 000 / 751 483 999 / 721 704 777
Frequently Asked Questions
What are the common parts needed for urinal repair?
Common parts needed for urinal repair include:
1. **Flush Valve**: Controls the release of water into the urinal for flushing. It may need replacement if it leaks or fails to operate properly.
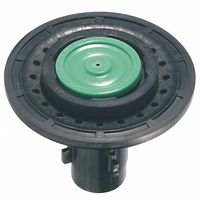
2. **Flushometer**: A type of flush valve often used in commercial settings. It can be manual or automatic and may require repair or replacement if it malfunctions.
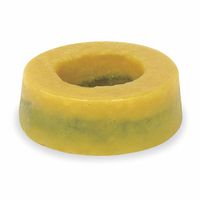
3. **Diaphragm Kit**: Part of the flushometer, it regulates water flow. A worn-out diaphragm can cause leaks or insufficient flushing.
4. **Gaskets and Seals**: These prevent leaks at various connection points. Over time, they can degrade and need replacement.
5. **Spud Coupling**: Connects the urinal to the flush valve. It may need replacement if it becomes corroded or damaged.
6. **Inlet Supply Line**: Delivers water to the urinal. It can become clogged or damaged, requiring repair or replacement.
7. **Trap**: A U-shaped pipe that prevents sewer gases from entering the bathroom. It can become clogged and may need cleaning or replacement.
8. **Urinal Cartridge**: Found in waterless urinals, it traps odors and facilitates drainage. It needs periodic replacement.
9. **Mounting Hardware**: Includes bolts, nuts, and brackets that secure the urinal to the wall. These can corrode or break over time.
10. **Sensor and Solenoid (for automatic urinals)**: Sensors detect user presence to trigger flushing, while solenoids control water flow. Malfunctioning components may need replacement.
11. **Overflow Tube**: Prevents water from spilling over if the urinal overfills. It may need adjustment or replacement if not functioning properly.
12. **P-Trap**: Part of the drainage system, it can become clogged and may need cleaning or replacement.
13. **Wax Ring or Seal**: Provides a watertight seal between the urinal and the wall or floor. It may need replacement if leaks occur.
How do I replace a urinal flush valve?
1. **Turn Off Water Supply**: Locate the shut-off valve near the urinal and turn it clockwise to stop the water flow.
2. **Flush and Drain**: Flush the urinal to remove any remaining water in the system. Use a sponge or towel to soak up any excess water in the urinal.
3. **Remove the Old Flush Valve**: Use a wrench to loosen and remove the nuts securing the flush valve to the urinal. Carefully detach the flush valve from the water supply line and the urinal.
4. **Prepare the New Flush Valve**: Unpack the new flush valve and ensure all components are present. Follow the manufacturer's instructions to assemble any parts if necessary.
5. **Install the New Flush Valve**: Position the new flush valve in place. Attach it to the urinal and the water supply line, ensuring a snug fit. Use a wrench to tighten the nuts, but avoid over-tightening to prevent damage.
6. **Check for Leaks**: Turn the water supply back on by turning the shut-off valve counterclockwise. Observe the connections for any leaks. If leaks are present, tighten the connections slightly.
7. **Test the Flush Valve**: Flush the urinal several times to ensure the new valve operates correctly and efficiently. Adjust the flush volume if necessary, following the manufacturer's instructions.
8. **Final Inspection**: Check all connections and the surrounding area for any signs of leaks or issues. Ensure the flush valve is securely in place and functioning as expected.
9. **Clean Up**: Dispose of the old flush valve and any packaging materials appropriately. Clean the area around the urinal to remove any debris or water spills.
What tools are required for urinal installation?
For urinal installation, the following tools are typically required:
1. **Measuring Tape**: To measure the height and distance for proper placement of the urinal.
2. **Level**: Ensures the urinal is installed straight and even.
3. **Drill and Drill Bits**: Used for creating holes in the wall to mount the urinal.
4. **Screwdriver**: For securing screws and mounting brackets.
5. **Adjustable Wrench**: Useful for tightening nuts and bolts, especially for plumbing connections.
6. **Pipe Wrench**: Specifically for gripping and turning pipes.
7. **Pipe Cutter or Hacksaw**: To cut pipes to the required length.
8. **Plumber’s Tape (Teflon Tape)**: Used to seal pipe threads to prevent leaks.
9. **Caulking Gun and Silicone Sealant**: For sealing around the urinal to prevent water leakage.
10. **Bucket and Sponge**: To clean up any spills or excess water during installation.
11. **Safety Gear**: Such as gloves and goggles to protect against debris and sharp edges.
12. **Pencil or Marker**: For marking drill points and measurements on the wall.
13. **Stud Finder**: To locate studs in the wall for secure mounting.
14. **Plumbing Snake or Auger**: In case of any blockages in the drain line.
15. **Flashlight**: To illuminate dark areas, especially if working in poorly lit spaces.
16. **Plumbing Putty**: For sealing joints and connections.
These tools help ensure a secure and leak-free installation of the urinal, adhering to plumbing standards and safety regulations.
How do I fix a leaking urinal?
1. **Turn Off Water Supply**: Locate the shut-off valve, usually behind or near the urinal, and turn it off to stop water flow.
2. **Identify the Leak Source**: Check for leaks at the flush valve, drain, or water supply line. Common issues include worn-out gaskets, seals, or washers.
3. **Flush and Drain**: Flush the urinal to remove any remaining water. Use a sponge or towel to soak up excess water in the bowl and trap.
4. **Inspect and Replace Parts**:
- **Flush Valve**: If leaking, remove the valve cover and inspect the diaphragm or gasket. Replace if worn or damaged.
- **Supply Line**: Check for cracks or loose connections. Tighten fittings or replace the line if necessary.
- **Trap and Drain**: If the leak is at the drain, remove the urinal from the wall, inspect the trap, and replace any faulty seals or washers.
5. **Reassemble and Test**: Reattach all parts securely. Turn the water supply back on and flush the urinal to check for leaks.
6. **Seal Joints**: Use plumber’s tape or pipe joint compound on threaded connections to ensure a watertight seal.
7. **Check for Additional Leaks**: Observe the urinal for a few minutes to ensure no further leaks occur.
8. **Regular Maintenance**: Periodically check and maintain seals, gaskets, and connections to prevent future leaks.
If the leak persists, consider consulting a professional plumber for further diagnosis and repair.
What cleaning products are best for maintaining urinals?
To maintain urinals effectively, it's essential to use the right cleaning products that ensure hygiene, prevent odors, and maintain the fixture's appearance. Here are some of the best cleaning products for urinals:
1. **Enzymatic Cleaners**: These are ideal for breaking down uric acid and other organic materials that cause odors. They contain beneficial bacteria that digest waste, reducing buildup and preventing clogs.
2. **Descaling Agents**: Hard water can lead to mineral deposits in urinals. Descaling agents, often containing mild acids like citric or phosphoric acid, help dissolve these deposits, keeping the urinal clean and functional.
3. **Disinfectant Cleaners**: To ensure hygiene, use disinfectant cleaners that kill bacteria and viruses. Look for products with EPA registration to ensure they meet health standards.
4. **Urinal Screens and Blocks**: These not only help in reducing splash-back but also release cleaning agents and fragrances gradually, maintaining freshness between cleanings.
5. **Non-Acid Bowl Cleaners**: For regular cleaning, non-acidic cleaners are gentle on surfaces and effective in removing stains and odors without damaging the urinal.
6. **Foaming Cleaners**: These expand to cover the entire surface, ensuring thorough cleaning. They are effective in removing grime and preventing buildup.
7. **Natural Cleaners**: For an eco-friendly option, natural cleaners with plant-based ingredients can be effective. They are less harsh on plumbing and the environment.
Regular maintenance with these products, combined with proper cleaning techniques, will keep urinals in optimal condition, ensuring a clean and pleasant restroom environment.
How do I install a new urinal?
1. **Gather Materials and Tools**: Urinal, mounting brackets, bolts, washers, nuts, P-trap, water supply line, drain pipe, plumber's tape, wrench, drill, level, and safety gear.
2. **Turn Off Water Supply**: Shut off the water supply to the area where the urinal will be installed.
3. **Prepare the Wall**: Mark the desired height for the urinal on the wall. Ensure the wall can support the urinal's weight. Install backing if necessary.
4. **Install Mounting Brackets**: Use a level to ensure the brackets are straight. Drill holes into the wall at the marked points and secure the brackets with bolts.
5. **Attach the Urinal**: Lift the urinal and hang it on the mounting brackets. Secure it with washers and nuts. Ensure it is level.
6. **Connect the Drain**: Attach the P-trap to the urinal's drain outlet. Connect the P-trap to the existing drain pipe. Ensure all connections are tight to prevent leaks.
7. **Connect the Water Supply**: Attach the water supply line to the urinal's inlet. Use plumber's tape on threaded connections to ensure a watertight seal. Connect the other end to the water supply.
8. **Test for Leaks**: Turn the water supply back on. Flush the urinal several times to check for leaks in the water supply and drain connections.
9. **Seal Around the Urinal**: Apply a bead of silicone sealant around the edges of the urinal where it meets the wall to prevent water damage.
10. **Clean Up**: Remove any debris and clean the area around the urinal.
11. **Final Inspection**: Ensure the urinal is securely mounted, level, and functioning properly.
Where can I buy urinal repair parts and accessories?
You can purchase urinal repair parts and accessories from a variety of sources:
1. **Home Improvement Stores**: Major chains like Home Depot, Lowe’s, and Menards offer a wide range of plumbing supplies, including urinal repair parts. They have both physical locations and online stores where you can browse and purchase items.
2. **Plumbing Supply Stores**: Specialized plumbing supply stores often carry a more extensive selection of urinal parts and accessories. These stores cater to both professionals and DIY enthusiasts, providing expert advice and specialized products.
3. **Online Retailers**: Websites like Amazon, eBay, and Walmart offer a vast selection of urinal repair parts. These platforms provide customer reviews and ratings, which can help in making informed purchasing decisions.
4. **Manufacturer Websites**: If you know the brand of your urinal, visiting the manufacturer’s website can be beneficial. Brands like Sloan, Zurn, and American Standard often sell parts directly or provide a list of authorized dealers.
5. **Local Hardware Stores**: Smaller, independent hardware stores may also stock common urinal repair parts. While their selection might be limited compared to larger chains, they often provide personalized service and advice.
6. **Plumbing Contractors**: Some plumbing contractors sell parts directly to consumers. They can also offer installation services if needed.
7. **Online Plumbing Supply Stores**: Websites like SupplyHouse.com, PlumbingSupply.com, and FaucetDirect.com specialize in plumbing parts and accessories, offering a wide range of products specifically for urinals.
8. **Auction Sites**: Occasionally, auction sites like GovDeals or Liquidation.com may have bulk lots of plumbing supplies, including urinal parts, available for purchase.
When purchasing, ensure compatibility with your specific urinal model and check return policies in case the parts do not fit or meet your needs.