Call +(254) 703 030 000 / 751 483 999 / 721 704 777
.....Read More


Frequently Asked Questions
What are the essential items to include in an emergency preparedness kit?
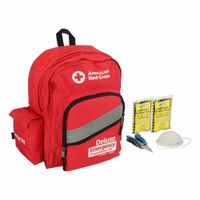
An emergency preparedness kit is crucial for survival during disasters. Essential items include:
1. **Water**: At least one gallon per person per day for three days for drinking and sanitation.
2. **Food**: A three-day supply of non-perishable food items.
3. **Manual Can Opener**: For canned food.
4. **Battery-powered or Hand-crank Radio**: To receive emergency alerts and updates.
5. **Flashlight**: With extra batteries for visibility in the dark.
6. **First Aid Kit**: Including bandages, antiseptics, pain relievers, and any personal medications.
7. **Whistle**: To signal for help.
8. **Dust Mask**: To filter contaminated air.
9. **Plastic Sheeting and Duct Tape**: For shelter or to seal off rooms.
10. **Moist Towelettes, Garbage Bags, and Plastic Ties**: For personal sanitation.
11. **Wrench or Pliers**: To turn off utilities if necessary.
12. **Local Maps**: For navigation if GPS is unavailable.
13. **Cell Phone with Chargers and Backup Battery**: For communication.
14. **Cash**: In small denominations, as ATMs may not work.
15. **Important Documents**: Copies of personal identification, insurance policies, and bank records.
16. **Emergency Blanket**: For warmth.
17. **Clothing and Sturdy Shoes**: Appropriate for the season.
18. **Infant Formula, Diapers, and Supplies**: If applicable.
19. **Pet Supplies**: Food, water, and other necessities for pets.
20. **Multi-tool**: For various needs.
21. **Matches or Lighter**: In a waterproof container for starting fires.
22. **Personal Hygiene Items**: Such as toothbrushes and soap.
23. **Books, Games, or Puzzles**: For entertainment and stress relief.
Regularly check and update your kit to ensure all items are in working order and not expired.
How much water should be stored per person for emergencies?
For emergency preparedness, it is recommended to store at least one gallon of water per person per day. This amount covers both drinking and sanitation needs. The general guideline is to have a minimum three-day supply, which equates to three gallons per person. However, for more comprehensive preparedness, a two-week supply is advisable, totaling 14 gallons per person.
The one-gallon-per-day rule accounts for basic hydration and minimal hygiene. In hot climates, during physical exertion, or for individuals with specific health needs, water requirements may increase. It's crucial to consider these factors when planning your water storage.
Water should be stored in clean, food-grade containers. Commercially bottled water is a convenient option, but if you are storing tap water, ensure containers are sanitized and sealed tightly. Store water in a cool, dark place to prevent contamination and degradation.
Regularly rotate your water supply to maintain freshness. Commercially bottled water typically has a shelf life of one to two years, while tap water should be replaced every six months. Label containers with the date of storage to keep track.
In addition to stored water, consider having water purification methods on hand, such as filters, purification tablets, or bleach, to treat additional water sources if necessary. This can be crucial in extended emergencies where stored water may run out.
By following these guidelines, you can ensure that you have an adequate and safe water supply for emergencies, providing peace of mind and essential resources during unforeseen situations.
What are the best non-perishable foods for emergency survival kits?
The best non-perishable foods for emergency survival kits are those that provide essential nutrients, have a long shelf life, and are easy to store and prepare. Here are some top choices:
1. **Canned Goods**: Canned vegetables, fruits, beans, and meats (like tuna, chicken, or beef) are excellent for their longevity and nutritional value. Opt for low-sodium options when possible.
2. **Dried Grains and Legumes**: Rice, quinoa, lentils, and beans are rich in carbohydrates and proteins. They are versatile and can be cooked with minimal resources.
3. **Nut Butters**: Peanut butter or almond butter are high in protein and healthy fats, providing energy and satiety.
4. **Dehydrated or Freeze-Dried Foods**: These include fruits, vegetables, and complete meals. They are lightweight and only require water to rehydrate.
5. **Pasta and Noodles**: These are easy to cook and can be paired with canned sauces or vegetables for a complete meal.
6. **Cereal and Granola**: These are good sources of carbohydrates and can be eaten dry or with powdered milk.
7. **Energy Bars and Trail Mix**: These provide quick energy and are easy to carry. Look for options with nuts, seeds, and dried fruits.
8. **Powdered Milk and Protein Powders**: These are essential for calcium and protein intake, especially if fresh dairy is unavailable.
9. **Canned Soups and Stews**: These are convenient and can be a complete meal in themselves.
10. **Honey and Sugar**: These have an indefinite shelf life and can be used as sweeteners or energy sources.
11. **Salt and Spices**: Essential for flavoring and preserving food.
12. **Instant Coffee and Tea**: For comfort and a caffeine boost.
These items ensure a balanced diet, providing carbohydrates, proteins, fats, vitamins, and minerals necessary for survival during emergencies.
How often should emergency supplies be checked and replaced?
Emergency supplies should be checked and replaced at least every six months. This regular schedule ensures that all items remain in good condition and are ready for use when needed. During these checks, inspect perishable items like food and water for expiration dates and replace them as necessary. Batteries, medications, and first-aid supplies should also be examined for expiration or depletion and replaced accordingly.
Additionally, consider seasonal changes and specific needs that might arise. For instance, in preparation for winter, ensure that warm clothing and blankets are included, while summer might require additional water and sun protection. It's also important to update any personal items, such as prescription medications or important documents, to reflect current needs and information.
Incorporate a reminder system, such as calendar alerts or a checklist, to ensure these checks are conducted consistently. This proactive approach helps maintain the effectiveness and reliability of your emergency supplies, providing peace of mind and readiness in case of an emergency.
What are the best temporary emergency shelters for natural disasters?
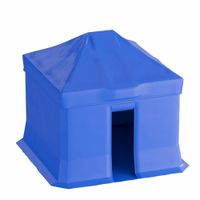
The best temporary emergency shelters for natural disasters are those that provide safety, are easy to deploy, and can accommodate the needs of affected populations. Key options include:
1. **Tents**: Lightweight and portable, tents are a common choice for immediate shelter. They can be quickly set up and provide basic protection from the elements. Variants like geodesic dome tents offer enhanced stability in harsh weather.
2. **Prefabricated Modular Shelters**: These are pre-built sections that can be quickly assembled on-site. They offer better insulation and durability compared to tents and can be reused for future emergencies.
3. **Shipping Containers**: Repurposed shipping containers are robust and can be rapidly deployed. They provide excellent protection against severe weather and can be modified to include insulation, windows, and doors.
4. **Inflatable Shelters**: These structures can be rapidly inflated and provide immediate protection. They are lightweight, easy to transport, and can be used in various terrains.
5. **Rapidly Deployable Housing Units**: These are designed for quick assembly and can include features like solar panels and water purification systems. They offer a more sustainable and comfortable living environment.
6. **Community Shelters**: Large structures like school gyms or community centers can be converted into temporary shelters. They can accommodate many people and often have existing facilities like kitchens and bathrooms.
7. **Yurts**: Traditional yurts are portable and can be set up quickly. They offer good insulation and can withstand various weather conditions.
The choice of shelter depends on factors like the scale of the disaster, climate, available resources, and the duration of displacement. Effective emergency shelters should prioritize safety, accessibility, and the well-being of occupants.
How can I prepare my home for a natural disaster?
To prepare your home for a natural disaster, start by creating an emergency plan. Identify safe areas in your home for different types of disasters, such as basements for tornadoes or high ground for floods. Ensure all family members know the plan and conduct regular drills.
Assemble an emergency kit with essentials like water, non-perishable food, a first-aid kit, flashlights, batteries, and important documents. Store it in an easily accessible location. Include items specific to your family’s needs, such as medications or pet supplies.
Secure your home by reinforcing doors and windows. Install storm shutters or use plywood to protect windows during hurricanes. Anchor heavy furniture and appliances to walls to prevent tipping during earthquakes. Trim trees and remove dead branches to minimize damage from high winds.
Ensure your home’s structural integrity by checking the roof, foundation, and walls for weaknesses. Consider retrofitting older homes to withstand earthquakes or adding flood barriers if you live in a flood-prone area.
Stay informed by signing up for local emergency alerts and having a battery-powered or hand-crank radio. Know the evacuation routes and have a plan for where to go if you need to leave your home.
Maintain your home’s utilities by knowing how to shut off water, gas, and electricity. Install smoke and carbon monoxide detectors and ensure they are functioning properly.
Finally, review your insurance coverage to ensure it includes natural disasters common in your area. Keep an inventory of your home’s contents for insurance claims.
By taking these steps, you can enhance your home’s resilience and ensure your family’s safety during a natural disaster.
What are the most effective ways to purify water in an emergency?
In an emergency, purifying water is crucial to ensure it is safe for consumption. Here are the most effective methods:
1. **Boiling**: Boiling water is one of the simplest and most effective methods. Bring water to a rolling boil for at least one minute (or three minutes at altitudes above 6,500 feet) to kill pathogens like bacteria, viruses, and parasites.
2. **Filtration**: Use portable water filters or filtration systems that can remove bacteria, protozoa, and some viruses. Look for filters with a pore size of 0.1 to 0.4 microns. Some advanced filters also include activated carbon to remove chemicals and improve taste.
3. **Chemical Disinfection**: Use water purification tablets or drops containing iodine, chlorine, or chlorine dioxide. Follow the instructions carefully regarding dosage and wait time to ensure effectiveness against pathogens.
4. **Solar Disinfection (SODIS)**: Fill clear plastic bottles with water and expose them to direct sunlight for at least six hours. UV rays from the sun can kill bacteria and viruses. This method is best for small quantities and clear water.
5. **Distillation**: Involves heating water to create steam, then condensing it back into liquid. This process removes most impurities, including heavy metals and salts, but requires equipment and time.
6. **UV Light Purifiers**: Portable UV light devices can effectively kill bacteria, viruses, and protozoa. They are battery-operated and require clear water to work efficiently.
7. **Improvised Methods**: In dire situations, use cloth or sand to filter out large particles, then combine with other methods like boiling or chemical disinfection for better results.
Each method has its limitations and may require combining techniques for optimal safety. Always prioritize methods based on available resources and the specific contaminants present in the water.
How do I create an emergency communication plan for my family?
#NAME?
What are the best practices for decontamination in a chemical emergency?
In a chemical emergency, effective decontamination is crucial to minimize harm. The best practices include:
1. **Immediate Response**: Quickly assess the situation and identify the chemical involved. Evacuate the area if necessary to prevent further exposure.
2. **Personal Protection**: Ensure responders wear appropriate personal protective equipment (PPE) such as gloves, masks, and suits to prevent contamination.
3. **Containment**: Isolate the contaminated area to prevent the spread of hazardous substances. Use barriers and signage to restrict access.
4. **Decontamination Zones**: Establish hot, warm, and cold zones. The hot zone is the contaminated area, the warm zone is for decontamination, and the cold zone is for clean personnel and equipment.
5. **Decontamination Process**:
- **Dry Decontamination**: Remove contaminated clothing and items. This can eliminate up to 80-90% of contaminants.
- **Wet Decontamination**: Use water or appropriate decontamination solutions to wash off remaining contaminants. Ensure runoff is contained to prevent environmental contamination.
6. **Decontamination Solutions**: Use soap and water for general decontamination. For specific chemicals, use neutralizing agents as recommended by safety data sheets (SDS).
7. **Medical Evaluation**: Provide medical assessment and treatment for affected individuals. Monitor for symptoms of chemical exposure.
8. **Waste Disposal**: Properly dispose of contaminated materials and PPE according to hazardous waste regulations.
9. **Communication**: Maintain clear communication with emergency services, medical personnel, and the public. Provide updates and instructions as needed.
10. **Documentation and Review**: Document the incident, response actions, and outcomes. Conduct a review to improve future response strategies.
These practices help ensure safety and efficiency during chemical emergencies.
How can I ensure my emergency supplies are accessible during a disaster?
To ensure your emergency supplies are accessible during a disaster, start by selecting a strategic location for storage. Choose a spot that is easily reachable, such as a hallway closet or a designated area in the garage, and ensure it is not prone to flooding or structural damage. Clearly label the storage area and keep it free from clutter to allow quick access.
Organize supplies in a logical manner, using clear bins or bags for visibility. Group items by category, such as food, water, first aid, and tools, and label each container. Place frequently used or essential items at the front or top for easy retrieval.
Regularly update and maintain your supplies. Check expiration dates on food, water, and medications, and replace them as needed. Test batteries and equipment like flashlights and radios to ensure they are in working order. Conduct periodic inventory checks to ensure nothing is missing or damaged.
Create a detailed inventory list and keep a copy in the storage area and another in a digital format accessible via your phone or cloud storage. This helps in quickly identifying and locating items during an emergency.
Involve all household members in the planning process. Conduct drills to familiarize everyone with the location and contents of the emergency supplies. Ensure everyone knows how to use essential items like fire extinguishers, first aid kits, and emergency radios.
Consider accessibility for all family members, including children, elderly, or those with disabilities. Ensure that they can reach and use the supplies independently if necessary.
Finally, stay informed about potential disasters in your area and adjust your emergency plan and supplies accordingly. This proactive approach ensures that your emergency supplies remain accessible and effective when needed.