Call +(254) 703 030 000 / 751 483 999 / 721 704 777
.....Read More
Frequently Asked Questions
What is medical-grade oxygen and how is it different from regular oxygen?
Medical-grade oxygen is a highly purified form of oxygen used for medical treatments and therapies. It is produced and stored under strict regulatory standards to ensure its safety and efficacy for human use. The purity level of medical-grade oxygen is typically 99.5% or higher, and it is free from contaminants and impurities that could be harmful to patients.
In contrast, regular oxygen, such as that used in industrial applications, may not meet the same stringent purity standards. Industrial oxygen can contain impurities and is not subject to the same rigorous testing and quality control processes as medical-grade oxygen. This makes it unsuitable for medical use, as contaminants could pose health risks to patients.
Medical-grade oxygen is delivered in specially designed cylinders or through medical oxygen concentrators, and it is administered under the supervision of healthcare professionals. It is used in various medical settings, including hospitals, clinics, and home care, to treat conditions such as respiratory distress, chronic obstructive pulmonary disease (COPD), and during surgical procedures.
The key differences between medical-grade and regular oxygen lie in their purity, production standards, and intended use. Medical-grade oxygen is specifically manufactured to meet healthcare standards, ensuring it is safe for patient use, while regular oxygen is intended for industrial purposes and lacks the necessary purity and safety assurances for medical applications.
How do I choose the right medical oxygen cylinder size for my needs?
1. **Assess Oxygen Needs**: Consult with a healthcare provider to determine the required flow rate (liters per minute) and duration of oxygen therapy.
2. **Understand Cylinder Sizes**: Familiarize yourself with common cylinder sizes, such as:
- **M6 (B)**: Small, portable, holds about 165 liters.
- **M9 (C)**: Slightly larger, holds about 240 liters.
- **D**: Portable, holds about 425 liters.
- **E**: Larger portable, holds about 680 liters.
- **M (H/K)**: Large, stationary, holds about 3,450 liters.
3. **Calculate Usage Time**: Use the formula:
\[
\text{Duration (hours)} = \frac{\text{Cylinder capacity (liters)}}{\text{Flow rate (L/min)}} \times 60
\]
This helps estimate how long a cylinder will last at a given flow rate.
4. **Consider Mobility**: For active lifestyles, smaller, portable cylinders (M6, M9, D) are preferable. For home use, larger cylinders (E, M) may be more suitable.
5. **Evaluate Storage and Transport**: Ensure you have adequate space for storage and a means to transport the cylinder if needed.
6. **Check Refill and Replacement Options**: Consider the ease of refilling or replacing cylinders based on your location and supplier availability.
7. **Budget Considerations**: Factor in the cost of the cylinder, refills, and any additional equipment like regulators or carrying cases.
8. **Safety and Compliance**: Ensure the cylinder meets safety standards and regulations. Proper training on usage and handling is essential.
9. **Supplier Consultation**: Discuss with suppliers to understand options, delivery schedules, and support services.
10. **Trial Period**: If possible, test different sizes to find the most convenient and effective option for your lifestyle and medical needs.
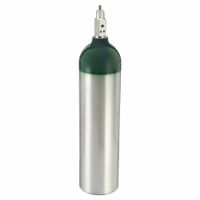
What are the safety precautions for storing and handling medical oxygen cylinders?
1. **Storage Location**: Store cylinders in a well-ventilated, dry, and clean area away from direct sunlight, heat sources, and flammable materials. Ensure the area is secure and accessible only to authorized personnel.
2. **Temperature Control**: Maintain storage temperatures between -20°C and 50°C. Avoid extreme temperatures to prevent pressure build-up or cylinder damage.
3. **Cylinder Positioning**: Store cylinders upright and secure them with chains or straps to prevent tipping. Use appropriate racks or stands.
4. **Separation**: Keep full and empty cylinders separate. Store oxygen cylinders at least 20 feet away from flammable gases or materials, or use a non-combustible barrier at least 5 feet high with a fire-resistance rating of at least 30 minutes.
5. **Labeling**: Clearly label cylinders with contents and ensure labels are visible. Do not deface or remove existing labels.
6. **Handling**: Use appropriate trolleys or carts for transportation. Avoid dragging, rolling, or dropping cylinders. Handle with care to prevent damage.
7. **Valve Protection**: Ensure valve caps are in place when cylinders are not in use. Open valves slowly and use appropriate regulators and fittings.
8. **No Smoking**: Prohibit smoking and open flames in areas where oxygen is stored or used. Display "No Smoking" signs prominently.
9. **Training**: Ensure personnel handling cylinders are trained in proper handling, storage, and emergency procedures.
10. **Inspection**: Regularly inspect cylinders for leaks, damage, or corrosion. Remove defective cylinders from service immediately.
11. **Emergency Preparedness**: Have fire extinguishers and emergency equipment readily available. Develop and practice emergency response plans.
12. **Documentation**: Maintain records of cylinder inventory, inspections, and maintenance activities.
13. **Regulatory Compliance**: Follow local, state, and federal regulations regarding the storage and handling of medical oxygen cylinders.
How do I properly use and maintain medical oxygen regulators and tubing?
To properly use and maintain medical oxygen regulators and tubing, follow these steps:
1. **Setup**: Ensure the oxygen cylinder is upright and secure. Attach the regulator to the cylinder valve, ensuring a tight fit to prevent leaks. Use a wrench if necessary, but avoid over-tightening.
2. **Regulator Adjustment**: Turn the cylinder valve counterclockwise to open it. Adjust the flow rate on the regulator to the prescribed level by turning the flow control knob. Ensure the flow meter ball is at the correct line.
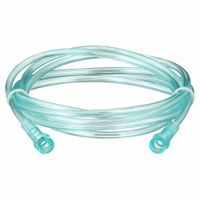
3. **Tubing Connection**: Connect the oxygen tubing to the regulator’s outlet. Ensure the connection is secure to prevent disconnection during use.
4. **Usage**: Place the nasal cannula or mask on the patient, ensuring comfort and proper fit. Check for kinks or obstructions in the tubing that could impede oxygen flow.
5. **Monitoring**: Regularly check the pressure gauge to monitor the oxygen level in the cylinder. Replace the cylinder before it is empty to ensure continuous supply.
6. **Maintenance**: Clean the nasal cannula or mask regularly with mild soap and water. Replace them as recommended by the manufacturer or healthcare provider.
7. **Leak Check**: Periodically check for leaks by listening for hissing sounds or using soapy water to identify bubbles at connections.
8. **Storage**: Store oxygen cylinders in a cool, dry place away from heat sources and flammable materials. Ensure they are secured to prevent tipping.
9. **Safety Precautions**: Avoid smoking or open flames near oxygen equipment. Ensure proper ventilation in the area where oxygen is used.
10. **Regular Inspection**: Inspect the regulator and tubing for wear and tear. Replace any damaged parts immediately to ensure safety and efficiency.
By following these guidelines, you can ensure the safe and effective use of medical oxygen equipment.
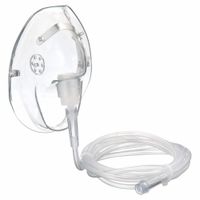
What is the difference between using a nasal cannula and an oxygen mask?
A nasal cannula and an oxygen mask are both devices used to deliver supplemental oxygen to patients, but they differ in design, application, and usage scenarios.
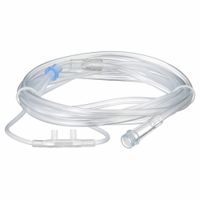
A nasal cannula consists of a lightweight tube with two prongs that are inserted into the nostrils. It is typically used for patients who require low to moderate levels of oxygen, generally up to 6 liters per minute. The nasal cannula allows for greater mobility and comfort, enabling patients to eat, speak, and move around more freely. It is often used in long-term oxygen therapy and in situations where patients need to maintain a relatively normal lifestyle.
An oxygen mask, on the other hand, covers the nose and mouth and is used to deliver higher concentrations of oxygen, typically ranging from 5 to 15 liters per minute. Masks can be simple face masks, venturi masks, or non-rebreather masks, each designed for specific oxygen delivery needs. Oxygen masks are used in acute care settings, such as during medical emergencies or surgeries, where precise and higher oxygen concentrations are required. They provide a more controlled oxygen delivery but can be less comfortable and restrict activities like eating and speaking.
In summary, the choice between a nasal cannula and an oxygen mask depends on the patient's oxygen needs, comfort, and the clinical setting. Nasal cannulas are preferred for lower oxygen requirements and greater comfort, while oxygen masks are used for higher oxygen needs and more controlled delivery.
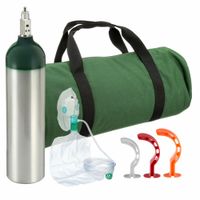
How do I set up and use a medical oxygen kit at home?
1. **Consultation**: Consult a healthcare professional to determine the need for home oxygen therapy and receive a prescription.
2. **Equipment**: Obtain the prescribed oxygen kit, which typically includes an oxygen concentrator or cylinder, nasal cannula or mask, and a humidifier bottle if needed.
3. **Location**: Place the oxygen concentrator in a well-ventilated area, away from heat sources and flammable materials.
4. **Setup**:
- **Concentrator**: Plug into an electrical outlet. Ensure the power switch is off before connecting.
- **Cylinder**: Secure the cylinder upright. Attach the regulator and flow meter.
5. **Humidifier (if prescribed)**: Fill with distilled water up to the indicated level. Connect it to the concentrator or cylinder.
6. **Cannula/Mask**: Attach the nasal cannula or mask to the oxygen outlet. Ensure it fits comfortably on the patient.
7. **Flow Rate**: Set the prescribed flow rate using the flow meter. Do not adjust without consulting a healthcare provider.
8. **Usage**:
- Turn on the concentrator or open the cylinder valve.
- Ensure oxygen is flowing by checking the flow meter or feeling the oxygen through the cannula/mask.
- Instruct the patient to breathe normally.
9. **Safety**:
- No smoking or open flames near the oxygen source.
- Regularly check for leaks or damage.
- Keep emergency contact numbers handy.
10. **Maintenance**:
- Clean the cannula/mask regularly.
- Refill or replace the cylinder as needed.
- Schedule regular maintenance for the concentrator.
11. **Monitoring**: Regularly monitor the patient’s oxygen levels using a pulse oximeter and report any concerns to a healthcare provider.
What are the signs that a ventilator test lung is functioning correctly?
A ventilator test lung is functioning correctly if it exhibits the following signs:
1. **Compliance and Resistance**: The test lung should accurately simulate the compliance and resistance settings. When adjusted, the test lung should reflect changes in compliance (measured in mL/cmH2O) and resistance (measured in cmH2O/L/s) as expected.
2. **Volume Delivery**: The test lung should receive and display the correct tidal volume as set on the ventilator. This ensures that the ventilator is delivering the appropriate volume of air.
3. **Pressure Monitoring**: The pressure readings on the ventilator should match the expected values based on the compliance and resistance settings of the test lung. This includes peak inspiratory pressure (PIP) and plateau pressure.
4. **Leakage Check**: There should be no significant air leaks. The test lung should maintain pressure without noticeable loss, indicating that the system is airtight.
5. **Waveform Analysis**: The pressure, volume, and flow waveforms should appear normal and consistent with the ventilator settings. Any irregularities could indicate a malfunction.
6. **Response to Changes**: The test lung should respond appropriately to changes in ventilator settings, such as changes in respiratory rate, tidal volume, or inspiratory time.
7. **Alarm Functionality**: The ventilator should trigger alarms appropriately when the test lung simulates conditions like disconnection or high pressure, ensuring the alarm system is functional.
8. **Durability and Reusability**: The test lung should withstand repeated use without degradation in performance, indicating it is robust and reliable.
9. **Calibration**: The test lung should be calibrated correctly, ensuring that all measurements and simulations are accurate.
10. **Visual Inspection**: There should be no visible damage or wear on the test lung that could affect its performance.