Call +(254) 703 030 000 / 751 483 999 / 721 704 777
Frequently Asked Questions
What is the difference between a utility sink and a laundry sink?
A utility sink and a laundry sink serve different purposes and have distinct features tailored to their specific uses.
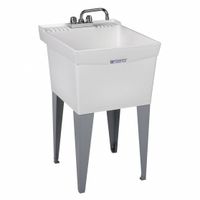
A utility sink, often found in garages, basements, or utility rooms, is designed for heavy-duty cleaning tasks. It is typically larger and deeper than a standard sink, allowing for the washing of large items such as paintbrushes, gardening tools, or even small pets. Utility sinks are usually made from durable materials like stainless steel, cast iron, or heavy-duty plastic to withstand harsh chemicals and rough use. They often have a high backsplash to protect walls from splashes and may include features like a built-in washboard or a hose attachment for added versatility.
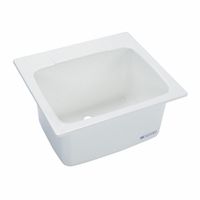
In contrast, a laundry sink is specifically designed for use in a laundry room. It is used primarily for pre-soaking clothes, hand-washing delicate garments, or treating stains before machine washing. Laundry sinks are generally smaller and shallower than utility sinks, as they are intended for handling clothing rather than large or heavy items. They are often made from materials like porcelain, acrylic, or stainless steel, which are suitable for handling detergents and fabric softeners. Some laundry sinks come with integrated washboards or ridges to assist in scrubbing clothes.
In summary, the main differences between a utility sink and a laundry sink lie in their size, material, and intended use. Utility sinks are larger, more robust, and designed for a variety of heavy-duty tasks, while laundry sinks are tailored for clothing care and are typically smaller and more delicate in construction.
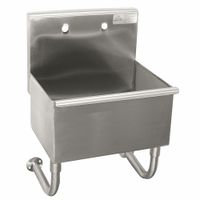
How do I install a wall-mounted utility sink?
1. **Choose Location**: Select a spot with access to water supply and drainage. Ensure the wall can support the sink's weight.
2. **Gather Materials**: You’ll need the sink, mounting brackets, screws, anchors, a drill, a level, a wrench, plumber’s tape, and plumbing supplies (pipes, fittings).
3. **Turn Off Water Supply**: Shut off the water supply to prevent leaks during installation.
4. **Mark Mounting Points**: Use a level to mark the height and position of the sink on the wall. Mark where the brackets will be installed.
5. **Install Mounting Brackets**: Drill holes at the marked points. Insert wall anchors if necessary, then attach the brackets using screws.
6. **Attach Sink to Brackets**: Lift the sink onto the brackets, ensuring it is level and securely attached.
7. **Connect Water Supply**: Attach the faucet to the sink. Connect the water supply lines to the faucet using plumber’s tape to ensure a tight seal.
8. **Install Drainage**: Connect the sink’s drain to the existing plumbing. Use a P-trap and ensure all connections are tight to prevent leaks.
9. **Test for Leaks**: Turn the water supply back on and test the faucet and drainage for leaks. Tighten connections if necessary.
10. **Seal Edges**: Apply silicone sealant around the edges of the sink where it meets the wall to prevent water seepage.
11. **Clean Up**: Remove any debris and clean the area around the sink.
12. **Final Check**: Ensure everything is secure and functioning properly. Adjust as needed.
What materials are best for utility and laundry sinks?
The best materials for utility and laundry sinks are those that offer durability, resistance to stains and chemicals, and ease of maintenance. Here are some top choices:
1. **Stainless Steel**: Known for its durability and resistance to rust and corrosion, stainless steel is a popular choice for utility sinks. It can withstand heavy use and is easy to clean. The material is also resistant to heat and chemicals, making it ideal for various tasks.
2. **Acrylic**: Lightweight and affordable, acrylic sinks are resistant to stains and scratches. They are easy to install and come in various colors and styles. However, they may not be as durable as other materials and can be prone to cracking under heavy impact.
3. **Porcelain**: Porcelain sinks offer a classic look and are highly resistant to stains and scratches. They are easy to clean and maintain, but they can chip or crack if subjected to heavy impact. Porcelain is best suited for environments where aesthetics are as important as functionality.
4. **Cast Iron with Enamel Coating**: These sinks are extremely durable and offer a traditional look. The enamel coating provides a smooth, easy-to-clean surface that resists stains and scratches. However, they are heavy and require sturdy support for installation.
5. **Composite Granite**: Made from a blend of granite stone dust and acrylic resins, composite granite sinks are durable and resistant to scratches and stains. They offer a modern look and are available in various colors. They are also heat-resistant and easy to maintain.
6. **Polypropylene**: This plastic material is lightweight, affordable, and resistant to chemicals and stains. It is easy to clean and install, making it a practical choice for utility sinks, though it may not be as durable as other options.
Each material has its advantages, and the best choice depends on specific needs, budget, and aesthetic preferences.
How do I unclog a utility sink drain?
To unclog a utility sink drain, follow these steps:
1. **Remove Debris**: Clear any visible debris from the sink and drain area. Use gloves to remove hair, soap scum, or other materials.
2. **Boiling Water**: Pour a kettle of boiling water down the drain to dissolve minor clogs caused by grease or soap.
3. **Plunger**: Use a plunger to dislodge the clog. Ensure there is enough water in the sink to cover the plunger's cup. Place the plunger over the drain and pump vigorously.
4. **Baking Soda and Vinegar**: Pour 1/2 cup of baking soda followed by 1/2 cup of vinegar down the drain. Let it sit for 15-30 minutes, then flush with hot water.
5. **Plumber’s Snake**: Insert a plumber’s snake into the drain. Turn the handle clockwise to break up the clog. Pull out the snake and remove any debris.
6. **Check P-Trap**: Place a bucket under the P-trap (the U-shaped pipe under the sink). Unscrew the slip nuts and remove the trap. Clean out any clogs and reassemble.
7. **Chemical Drain Cleaner**: As a last resort, use a chemical drain cleaner. Follow the instructions carefully and ensure proper ventilation.
8. **Prevent Future Clogs**: Regularly clean the drain with baking soda and vinegar, use a drain cover to catch debris, and avoid pouring grease down the sink.
If the clog persists, consider calling a professional plumber.
Can I use a utility sink for washing clothes?
Yes, you can use a utility sink for washing clothes. Utility sinks, also known as laundry sinks or slop sinks, are designed to handle a variety of cleaning tasks, including washing clothes. They are typically larger and deeper than standard sinks, making them suitable for hand-washing garments, soaking heavily soiled items, or pre-treating stains.
When using a utility sink for washing clothes, consider the following:
1. **Space and Size**: The ample size of a utility sink allows for easy maneuvering of clothes, making it ideal for washing larger items like blankets or delicates that require hand-washing.
2. **Water Temperature**: Ensure the sink is equipped with both hot and cold water options to accommodate different fabric care requirements. Hot water can help remove tough stains, while cold water is gentler on delicate fabrics.
3. **Detergent Use**: Use an appropriate amount of detergent suitable for hand-washing. Avoid using too much, as utility sinks may not have the same drainage efficiency as washing machines.
4. **Stain Treatment**: Utility sinks are perfect for pre-treating stains before machine washing. Apply stain remover and let the garment soak in the sink for better results.
5. **Drainage and Cleaning**: Ensure the sink is clean before and after use to prevent any residue or dirt from affecting your clothes. Check the drainage system to avoid clogs, especially when washing items that shed fibers.
6. **Convenience**: Utility sinks are often located in laundry rooms or basements, providing a convenient space for laundry tasks without interfering with kitchen or bathroom activities.
In summary, a utility sink is a versatile and practical option for washing clothes, especially for items that require special care or pre-treatment.
What size utility sink do I need for my space?
To determine the appropriate size for a utility sink, consider the following factors:
1. **Purpose and Usage**: Identify the primary tasks the sink will handle. For heavy-duty cleaning, a larger sink is preferable. If it's for light tasks, a smaller sink may suffice.
2. **Available Space**: Measure the area where the sink will be installed. Ensure there's enough room for the sink and any additional fixtures or storage. Consider the depth, width, and height to ensure it fits comfortably without obstructing movement.
3. **Capacity Needs**: Consider the volume of water or items the sink needs to accommodate. A deeper sink is beneficial for washing large items or handling significant water volumes.
4. **Material and Durability**: Choose a material that suits your needs. Stainless steel is durable and easy to clean, while plastic or composite materials might be more budget-friendly.
5. **Plumbing and Installation**: Ensure the plumbing setup can support the sink size you choose. Check for compatibility with existing water lines and drainage.
6. **Ergonomics**: Consider the height and depth for comfortable use. A sink that's too deep or too high can cause strain during prolonged use.
7. **Aesthetic and Design**: Match the sink size and style with the surrounding decor. A well-integrated sink enhances the overall look of the space.
8. **Budget**: Larger and more durable sinks may cost more. Balance your needs with your budget constraints.
By evaluating these factors, you can select a utility sink that fits your space and meets your functional requirements.
How do I maintain and clean a utility sink?
To maintain and clean a utility sink, follow these steps:
1. **Regular Rinsing**: After each use, rinse the sink with warm water to remove any debris or residue. This prevents buildup and keeps the sink fresh.
2. **Daily Wipe Down**: Use a damp cloth or sponge with mild dish soap to wipe down the sink daily. This helps remove any surface dirt and prevents stains.
3. **Deep Cleaning**: Once a week, perform a deep clean. Sprinkle baking soda over the sink surface, then scrub with a sponge or brush. Baking soda acts as a gentle abrasive to remove stains and odors.
4. **Tackle Stubborn Stains**: For tough stains, apply a paste of baking soda and water or use a non-abrasive cleaner. Let it sit for a few minutes before scrubbing.
5. **Disinfecting**: Use a solution of one part vinegar to one part water to disinfect the sink. Spray it on, let it sit for 10 minutes, then rinse thoroughly. Alternatively, use a commercial disinfectant following the manufacturer's instructions.
6. **Clean the Drain**: Pour a mixture of baking soda and vinegar down the drain monthly to prevent clogs. Follow with boiling water to flush out any residue.
7. **Remove Mineral Deposits**: For hard water stains, apply white vinegar directly to the affected areas. Let it sit for a few minutes, then scrub and rinse.
8. **Polish Fixtures**: Clean and polish faucets and handles with a mixture of vinegar and water or a commercial metal polish to keep them shiny and free of water spots.
9. **Preventive Measures**: Use a sink strainer to catch debris and avoid pouring grease or heavy chemicals down the drain to prevent clogs and damage.
10. **Regular Inspection**: Check for leaks or damage regularly and address any issues promptly to maintain the sink's functionality.