Call +(254) 703 030 000 / 751 483 999 / 721 704 777
.....Read More

Frequently Asked Questions
What is tool tethering and why is it important?
Tool tethering is the practice of securing tools to prevent them from falling, especially when working at heights. This involves using lanyards, tethers, and other securing devices to attach tools to a worker's belt, harness, or a fixed structure. The primary goal is to enhance safety by preventing tools from becoming falling hazards, which can cause injury to people below or damage to property.
The importance of tool tethering lies in its ability to mitigate risks associated with dropped tools. In industries such as construction, oil and gas, and telecommunications, workers often operate at significant heights. A dropped tool can gain momentum and cause severe injuries or fatalities to those below. Additionally, falling tools can damage sensitive equipment or structures, leading to costly repairs and project delays.
Tool tethering also contributes to productivity. By preventing tools from falling, workers spend less time retrieving dropped items, allowing them to focus on their tasks. This can lead to more efficient work processes and reduced downtime.
Moreover, tool tethering is often a regulatory requirement. Many safety standards and guidelines mandate the use of tool tethering systems to ensure workplace safety. Compliance with these regulations not only protects workers but also shields companies from potential legal liabilities and fines.
In summary, tool tethering is a critical safety practice that prevents tools from becoming falling hazards, thereby protecting workers, equipment, and structures. It enhances safety, boosts productivity, and ensures compliance with safety regulations.
How do you determine the load rating for tool tethers?
To determine the load rating for tool tethers, consider the following factors:
1. **Tool Weight**: The tether must support the weight of the tool it is intended to secure. Manufacturers typically specify the maximum weight capacity, which should exceed the tool's weight.
2. **Safety Factor**: Apply a safety factor to account for dynamic forces, such as tool movement or accidental drops. A common safety factor is 2:1 or 3:1, meaning the tether should withstand two to three times the tool's weight.
3. **Material Strength**: Assess the material used in the tether, such as webbing, wire, or rope. Materials should be durable and resistant to wear, abrasion, and environmental factors like UV exposure or chemicals.
4. **Design and Construction**: Evaluate the tether's design, including stitching, connectors, and attachment points. High-quality construction ensures reliability and longevity.
5. **Testing and Certification**: Check if the tether has been tested and certified by relevant safety standards or organizations, such as ANSI/ISEA 121-2018, which provides guidelines for dropped object prevention solutions.
6. **Usage Environment**: Consider the environment where the tether will be used. Extreme temperatures, moisture, or corrosive conditions may affect the tether's performance and load rating.
7. **Manufacturer Guidelines**: Follow the manufacturer's instructions and guidelines for load ratings and usage. They provide specific recommendations based on testing and design.
8. **Inspection and Maintenance**: Regularly inspect tethers for signs of wear, damage, or degradation. Proper maintenance ensures the tether remains within its load rating.
By considering these factors, you can determine the appropriate load rating for tool tethers, ensuring safety and compliance in the workplace.
What are the best practices for using tool tethers?
1. **Select Appropriate Tethers**: Choose tethers that match the weight and type of the tool. Ensure they are rated for the specific load capacity.
2. **Inspect Regularly**: Before each use, inspect tethers for wear, fraying, or damage. Replace any compromised tethers immediately.
3. **Secure Attachment Points**: Use designated attachment points on tools and ensure they are secure. Avoid makeshift solutions that could fail.
4. **Proper Length**: Use tethers of appropriate length to prevent entanglement or snagging, while allowing sufficient movement for tool use.
5. **Training**: Provide comprehensive training for workers on the correct use and inspection of tool tethers.
6. **Avoid Overloading**: Never exceed the tether’s weight capacity. Check the combined weight of the tool and tether to ensure it is within safe limits.
7. **Use with PPE**: Integrate tool tethers with personal protective equipment (PPE) to ensure overall safety.
8. **Minimize Swing**: Position tethers to minimize the swing radius of a dropped tool, reducing the risk of injury or damage.
9. **Environmental Considerations**: Consider environmental factors such as wind or temperature that may affect tether performance.
10. **Documentation**: Maintain records of inspections, training, and any incidents involving tool tethers for accountability and improvement.
11. **Emergency Procedures**: Establish and communicate clear procedures for dealing with dropped tools or tether failures.
12. **Compatibility**: Ensure tethers are compatible with other safety systems in use, such as harnesses or lanyards.
13. **Regular Updates**: Stay informed about new technologies and best practices in tool tethering to continuously improve safety measures.
How do you choose the right anchor points for tool tethers?
Choosing the right anchor points for tool tethers involves several key considerations to ensure safety and effectiveness:
1. **Load Capacity**: Ensure the anchor point can support the weight of the tool and any potential dynamic forces. It should be rated for the maximum load it might encounter.
2. **Location**: Select an anchor point that minimizes the risk of entanglement or interference with work tasks. It should be easily accessible and not obstruct the worker's movement.
3. **Structural Integrity**: The anchor point must be part of a structure that is stable and strong enough to withstand the forces applied by a falling tool. Avoid using temporary or weak structures.
4. **Compatibility**: Ensure the anchor point is compatible with the tethering system being used. The connection should be secure and not prone to accidental release.
5. **Environmental Conditions**: Consider environmental factors such as exposure to chemicals, moisture, or extreme temperatures, which might affect the integrity of the anchor point or tether.
6. **Regulatory Compliance**: Ensure the anchor point meets any relevant safety standards and regulations specific to the industry or region.
7. **Inspection and Maintenance**: Choose anchor points that can be easily inspected and maintained. Regular checks are necessary to ensure ongoing safety and functionality.
8. **Redundancy**: Where possible, use multiple anchor points to provide redundancy, reducing the risk of failure.
9. **Training and Awareness**: Ensure workers are trained in identifying suitable anchor points and understand the importance of proper tethering.
10. **Risk Assessment**: Conduct a thorough risk assessment to identify potential hazards and ensure the chosen anchor points mitigate these risks effectively.
By considering these factors, you can select anchor points that enhance safety and efficiency in tool tethering applications.
What types of tools can be tethered?
Tools that can be tethered typically include those used in construction, maintenance, and various industrial settings to prevent them from falling and causing injury or damage. Common types of tools that can be tethered include:
1. **Hand Tools**: Hammers, screwdrivers, pliers, wrenches, and other small hand tools can be tethered using lanyards or tool belts with tethering points.
2. **Power Tools**: Drills, saws, grinders, and other portable power tools often have tethering points or can be fitted with tethering attachments to secure them during use.
3. **Measuring Instruments**: Tape measures, levels, and laser distance measurers can be tethered to prevent them from falling from heights.
4. **Fastening Tools**: Nail guns, staplers, and other fastening tools can be equipped with tethering systems to ensure they remain secure.
5. **Cutting Tools**: Knives, scissors, and other cutting instruments can be tethered to prevent accidental drops.
6. **Inspection Tools**: Cameras, mirrors, and other inspection devices used at heights can be tethered for safety.
7. **Specialty Tools**: Tools specific to certain trades, such as electricians' tools or plumbing tools, can also be tethered.
8. **Personal Protective Equipment (PPE)**: Items like helmets, goggles, and gloves can be tethered to ensure they remain with the user.
9. **Communication Devices**: Radios, phones, and other communication tools can be tethered to prevent loss or damage.
10. **Ladders and Platforms**: While not tools in the traditional sense, these can be secured with tethering systems to prevent movement or falls.
Tethering systems typically include lanyards, tool belts, and attachment points designed to secure tools to the user or a stable structure, reducing the risk of accidents and enhancing workplace safety.
How do you properly attach a tool tether to a tool?
To properly attach a tool tether to a tool, follow these steps:
1. **Select the Right Tether**: Choose a tether that matches the tool's weight and usage. Ensure it has the appropriate load rating and length for the task.
2. **Inspect the Tool**: Check the tool for any designated attachment points, such as built-in tethering holes or handles. If none exist, identify a secure area on the tool for attachment.
3. **Choose the Attachment Method**: Depending on the tool, use a carabiner, loop, or lanyard. For tools without built-in attachment points, consider using a tool cinch or a self-adhesive attachment point.
4. **Secure the Tether**:
- **Carabiner**: Clip the carabiner through the tool's attachment point or handle. Ensure the gate is fully closed and locked if it has a locking mechanism.
- **Loop or Lanyard**: Thread the loop through the tool's attachment point and pass the tether through the loop to create a secure knot.
- **Tool Cinch**: Wrap the cinch around the tool's handle or body, ensuring it is tight and secure.
5. **Test the Connection**: Gently tug on the tether to ensure it is securely attached and will not come loose during use.
6. **Attach to Anchor Point**: Connect the other end of the tether to a secure anchor point, such as a belt, harness, or fixed structure, ensuring it is within reach and does not impede movement.
7. **Regular Inspection**: Periodically check the tether and attachment points for wear and tear, replacing any damaged components immediately.
By following these steps, you ensure the tool is securely tethered, reducing the risk of accidents from dropped tools.
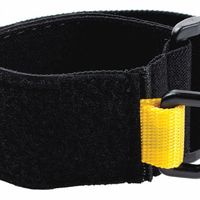
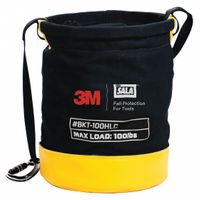
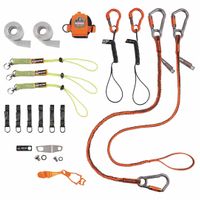
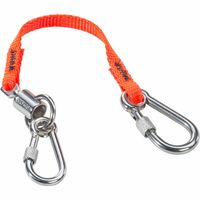
What are the components of a tool tether kit?
A tool tether kit typically includes several components designed to secure tools and prevent them from falling, especially in environments where dropped tools can pose safety hazards. The main components are:
1. **Tethers**: These are the primary components, often made from materials like nylon, polyester, or steel wire, and are designed to attach tools to a fixed point. They come in various lengths and weight capacities to accommodate different tools.
2. **Attachment Points**: These are connectors or loops that are affixed to the tools themselves. They can be adhesive-backed, heat-shrink, or looped around the tool, providing a secure point for the tether to attach.
3. **Carabiners**: These are used to connect the tether to a fixed point, such as a belt, harness, or anchor point. They are typically made of metal and come with locking mechanisms to ensure they remain securely closed.
4. **Tool Lanyards**: Similar to tethers, these are often elasticized and can stretch to allow for tool use while remaining attached. They may include shock-absorbing features to reduce the impact of a dropped tool.
5. **D-Rings and Anchors**: These are fixed points that can be attached to belts, harnesses, or workstations, providing a secure location to attach tethers or lanyards.
6. **Tool Holsters and Pouches**: These are designed to hold tools securely when not in use, often with integrated tether points to keep tools attached even when holstered.
7. **Swivels**: These components allow for 360-degree rotation, preventing tethers from tangling as tools are used.
8. **Tool Collars and Grips**: These are used to create a secure attachment point on tools that lack built-in tethering options, often made from rubber or silicone for a snug fit.
Each component is selected based on the specific tools being used and the work environment to ensure maximum safety and efficiency.